

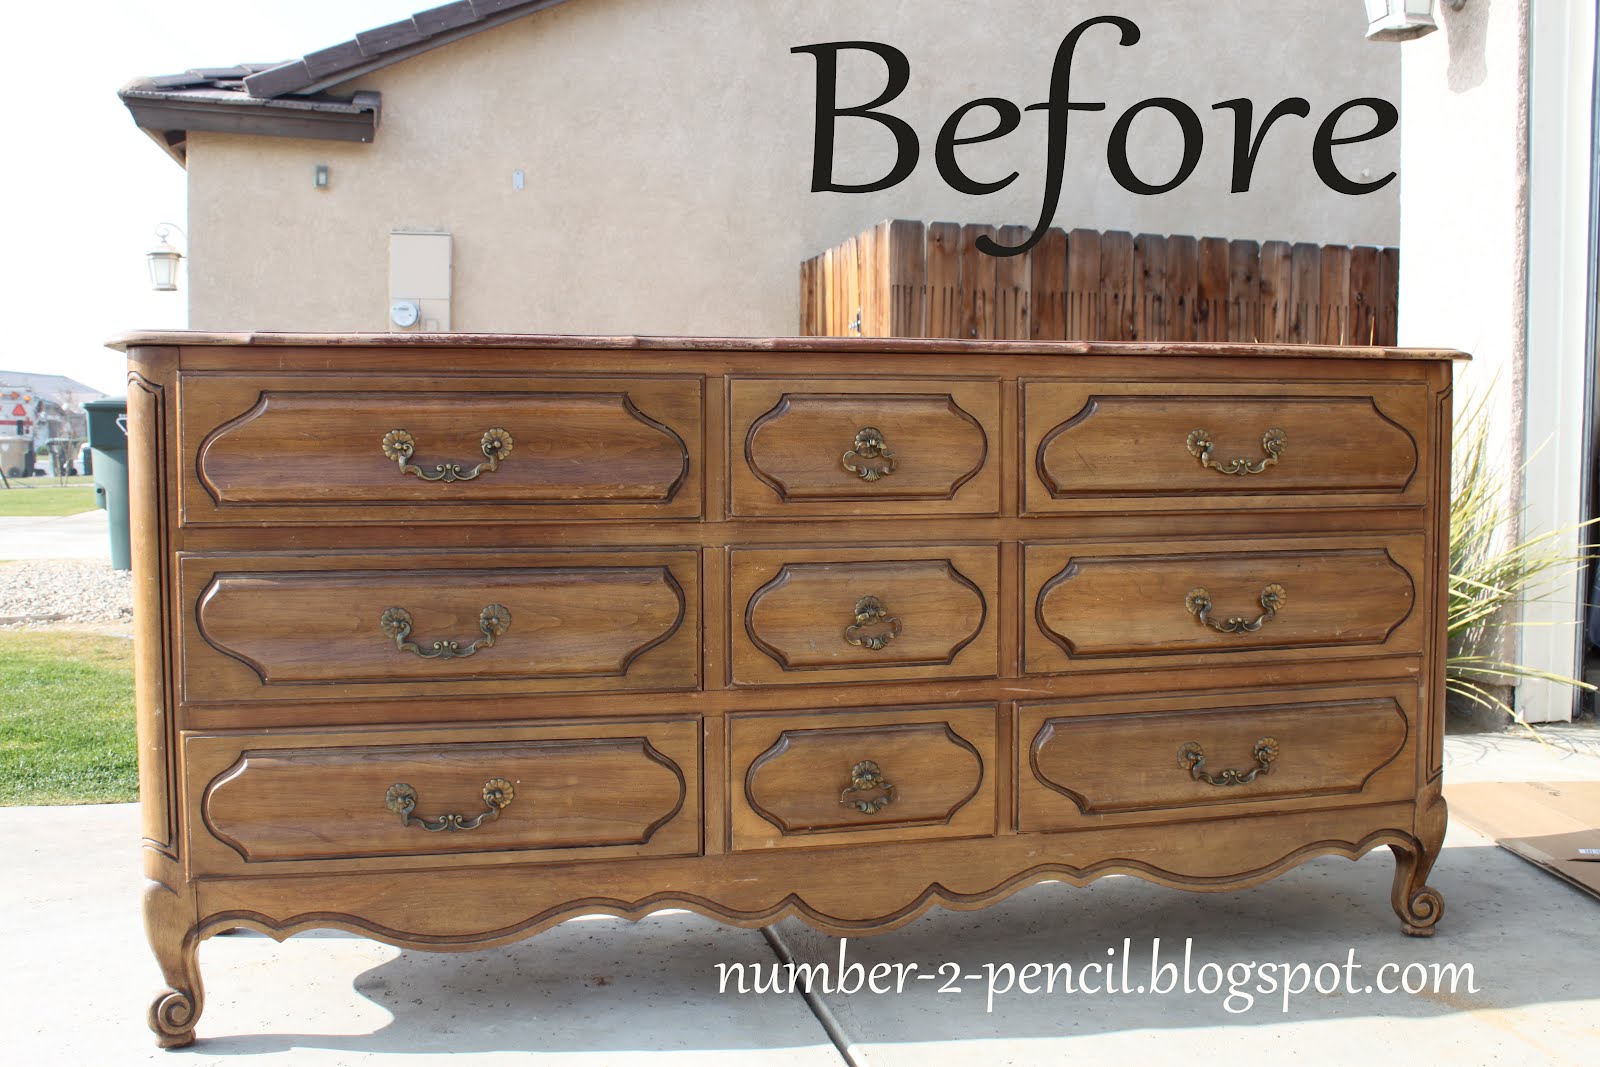
For my first blog post, I am sharing a favorite project I finished recently. This is how I turned a craigslist dresser into a media center.
I wanted something big to fill the huge niche that housed our TV. For months, I hunted for the right piece. Finally, a vague craigslist ad with no picture yield this for $100. An awesome vintage dresser made with real cherry wood and constructed with dovetail joints. A quality piece! Woohoo!

I really love how the dresser turned out. Here are the steps I took to get a super funky, distressed chippy paint look, if you want to do something similar:
1. Removed all the hardware and sanded the entire piece down. I did this because I wanted the cherry wood to show thorough rather than the funky speckled finish. After sanding, I wiped the entire piece down with baby wipes. Handy little things!
2. Then I grabbed a candle from my stash in the closet and hit all the edges and curves, and picked out some other choice spots where I wanted the paint to look chipped off. The wax resists the paint and at the end of the process, you hit those spots with a mouse sander and viola. Chippy paint!
3. I used Martha Stewart paint from Home Depot in Pencil, in an eggshell finish. (Last time I was there, the paint guy said they would no longer be carrying Martha Stewart paint! Boo!) I used a stiff paint brush, with a tiny bit of paint of the brush to dry brush the entire dresser by hand. It took forever, and about eight coats to get the color I wanted. Forever = two days.
To dry brush, you swipe gently with the grain of the wood and let dry between coats. Keep the coats very very thin to build up layers of color.
4. After I had the coverage I wanted, I let dry for another day. Then went to work with the mouse sander. I hit all the edges and corners, making sure to get every place I had rubbed the candle wax.
5. Another wipe down with baby wipes and it was ready for the next step. Following the directions on the bottle, I used Howard’s Feed-N-Wax to protect the dresser and give it a nice finish. Not too shiny, just a gorgeous gleam.
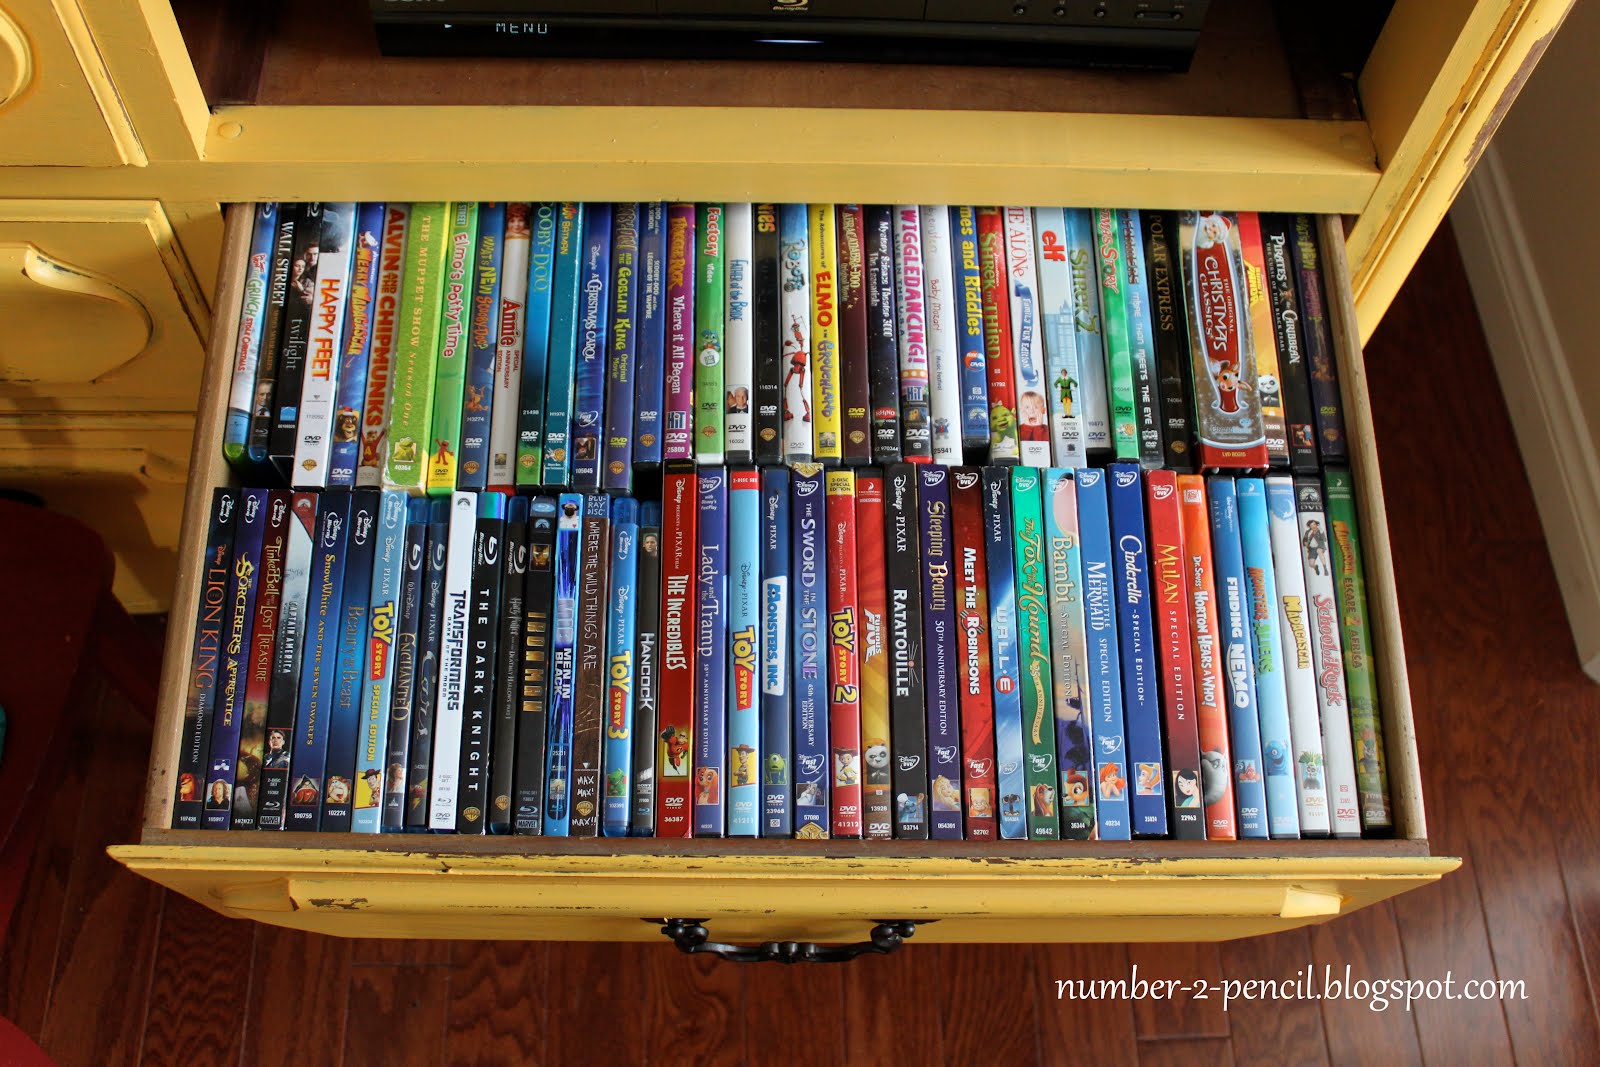
6. We spray painted the hardware with Rustoleum Oil Rubbed Bronze and when dry, put everything back together minus the top two drawers. I wanted to use those to hide our TV components. My husband used a drill to make two holes in the back panel of the dresser for the cords, and removed the drawer rails and we were all set! Side note: We saved everything, so it can easily be converted back to a dresser or even used as a buffet.
A few close up pictures of the distressed details…

See how the paint looks flaked and chipped, instead of just sanded off? That’s totally the candle wax, baby!

Bonus: We have a ton of storage for our DVD’s and remotes!
Here is a sad picture of the space before, complete with cute toddler accent. Notice the DVD’s stacked on top, out of said toddler’s reach.

And one more time, the after picture!

Total cost for this project was $150. $100 for the dresser, and $50 for paint and supplies. A quart of paint was more than enough. I didn’t even use 1/4 of a quart. When you are dry brushing, a little paint goes a long, long way. This piece makes a big impact in our living room, so I’m super happy with the results.
I’d love for you to keep up on my new posts and recipes by clicking on these cute buttons below, or follow me on Facebook and Twitter. You can also find me on Pinterest, that’s my favorite place to hang out and I’d love to see you there!
![]()


Thanks for reading!
Melissa
5 Easy Dinner Ideas for Busy Weeknights

My five FAVORITE recipes for busy families!
- Quick to make
- Light on your budget
- Easy to clean-up
- and...most important...absolutely DELICIOUS
Love the dresser, love the blog! Can’t wait to read more!!!
Thank you friend! You are so supportive!
Love that you have a blog for all of your great ideas! 🙂 Looking forward to the next installment.
Thank you Heather!!!!
So cool!!!! Love it!
It looks so great!
Thanks Mindy! I’m excited for your new project:0)
That is such a beautiful color…not too bright, but a warm yellow…love it! This really took some vision to see this as a media center…great job. I’m a new follower, but you know that GFC is going away in March, so sign up for the new Linky follower tool, so we can stay connected…it is on my sidebar, and lot of the blogs are going to this….Hope to see you soon, Lori
Thank you Lori! I didn’t know! I’m new to all this:0)
Great transformation … and love the toddler “accent” ….
Linda
Thank you Linda! I loved the post from your husband! Such a crack up!
LOVE it! I especially love the color. I snatched up the MS samplers they had left at home depot this week. 🙂
Awesome Micki! They only had one left when I was there!
Fabulous find and transformation! I love vintage and that dresser is a winner – especially with the fun yellow makeover! Thanks so much for joining our Impossibilities Challenge. Welcome to blogging a a new follower here.
Kelly
This is so great! I love the color, and the repurpose as a tv stand. Just awesome!!
Thanks so much for linking up to the challenge!
Karah
Gorgeous! Love the yellow. Love the lemons. Love the hardware. And I’d love it if you’d share this at my Show & Tell linkup, going on now @ the Delectable Home! Great inspiration!
Oh yes! Thank you!!!
Amazing transformation! I love the yellow and the antique finish! Good job!
LOVE what you did. Pinned it.
And, I’m your #14th follower! Woo! Hoo!
Good luck on the new blog –
You’re off to an amazing start!
~ Dana
Cooking at Cafe D
Thank you Dana!!!
This is so awesome! So many of us women just hate our TV areas and this baby is just the ticket! ♥
Thank you!!!
This came out so awesome! What an upgrade..
Hi Melissa,
Thanks for stopping by and linking up at Bacon Time. Would love to see you at our linky each week. I am your newest GFC follower. Yes I graduated from CSUB in June of 1999. I went to Foothill high. I still have lots of friends and close family in Bako. My siblings and mom and pop are there still. We are actually heading that way on Wednesday for a Friends wedding, but we will be staying at the Central Coast, which is where we lived before heading to Northern Cali. Nice to meet you. Love the name of your blog, and your dresser is beautiful. Can’t wait to see more. Now I know where to head if I ever get homesick. 🙂
I love this color and all the DVD storage!
melissa,
i pinned this idea to my small space idea board on pinterest. i always have clients asking about {pretty}storage. good luck with your entry to FOLK!
kathi
that looks amazing! i love it in yellow- what a statement piece!
that looks amazing! i love it in yellow- what a statement piece!
that looks so fabulous! i am itching to try something like this, but i can’t find the right piece and i know NOTHING about how to do it right!
I love, love, love this! Fun!!! The yellow is a greta choice – please come by my blog home – I would love for you to come by and link it up at my Creative Inspirations Party and Embracing Change going on right now! I would love to have you there!
Stacey
https://staceyembracingchange.blogspot.com
Your media cabinet turned out gorgeous!! I LOVE THE COLOR and your distressing technique!
I love it! I’ve been wanting to do something similar but couldnt picture it and now with your help, I’m super excited and inspired to take on the task. Thanks for sharing!
You are gonna be a very popular bloggie, me thinks 🙂
Thank you so much Dharma! Your kind words are making my day!!!
This turned out fantastic! Love the bright color and distressing. Thanks for linking up to the Thats The Ticket Blog Hop.
Wow this looks great. I have a more modern take on it! check it out- https://happyhomewithjessicaturner.blogspot.com/2012/03/chest-of-drawers-turned-tv-cabinet.html
Dont forget to follow us!
Looks awesome!!!
This is very much like what I’m looking to do. How did you turn the drawers into open spaces for your DVD player and such? Did you use the bottom of the drawer?
Hi Cat! Fortunately, this dresser had solid wood dividers between the drawers. So we just removed the drawer and set it aside.
If not, I would have cut a piece of mdf to rest on top of the drawer rails and painted or stained it to match. I hope that helps (and makes sense!) let me know if you have any other questions:0)
Gorgeous Makeover. Love that bright color, and now you have space for everything. I ran into you over at Furniture Feature Friday and had to come take a peek at your blog. Lovin it, so now Im following. Please come visit me at PICKINandPAINTIN.blogspot.com and maybe you’ll follow back. THANKS.
I’m in love with this dresser. The wax idea is genius. Lucky you that I don’t know where you live, otherwise I would have to steal this. Just sayin.
Well done. Good luck with your blogging.
Wonderfully done! I’d loose the top drawers as well, but keep the front panels and attach spring hinges to allow for opening to reveal electronics and to close for a cleaner look when not used.
I think we need one of these!
I think we need one of these!
Gorgeous!! Love the yellow!
My mother asked if she should convert her dresser to a media stand and I didn’t get it, but after seeing the amazing job you did, I now understand what she meant. Very cool. By the way, why is the bottom-right drawer front upside-down? Was that on purpose?
So funny! I never noticed and we look at it everyday! :0)
Girl, you rock!!! I’m so doing this to my latest vintage dresser find on Craigslist. Awesome!
This is a soon-to-do in my house…thank you for the helpful post and pics; it turned out lovely!!
Loveeeeeeeeeee! I am sharing this on My Milk Glass today! new follower 🙂
Hi there. I see that you removed 2 drawers for the cable and DVD boxes. Did you just removed the rails and drop in some plywood into those spaces?
I just found a dresser almost identical to this and I think I’m going to do the same thing. Thanks for the inspiration! But, I have a question, did you line the inside of the “cubbies” with wood or something before you put your equipment in there or just paint the inside? Once I took the two drawers out of mine, it’s not very pretty inside.
This is my exact dresser and I had the basic same ideas but your idea to use it as an entertainment center was amazing…great job.
I know you said your husband removed the drawer rails but what are your electronic components sitting on? Is it the bottom of the top drawer?? I’m looking to do this project very soon. Thanks!
Hi Melissa!
This is an older dresser, so each drawer has it’s own built in area, if that makes sense! Once you take out all the drawers, it still has “shelves.”